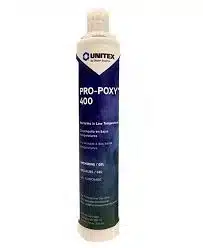
ProPoxy 400: Epoxy Anchoring Gel 8.5oz
$38.15
- 8.5oz Cartridge comes with nozzle
- Color: Gray
- Ideal for cold weather installations
- Moisture tolerant
- High strength adhesive
- Styrene free
- Non-sag gel consistency for horizontal and vertical installations
- 2 year shelf life
- ASTM C881 / AASHTO M235 Type II* Grade 3 Class A & B. *With exception of linear shrinkage and gel time.
- Application Temperature: 9 minutes of working time 59F and 15C is recommended
2 in stock
ProPoxy 400: Epoxy Anchoring Gel 8.5oz
ProPoxy 400 is a two component, moisture tolerant, styrene free, acrylic anchoring gel that meets ASTM C881 and AASHTO M235 specification requirements. Pro-Poxy 400 is formulated to set up at room temperatures and
down to temperatures of 15°F (-9°C).
Intended Use:
ProPoxy 400 is ideal for anchoring dowels, bolts, threaded rod, pins and reinforcement steel in concrete. ProPoxy 400 can also be used in cooler
and freezer applications or anywhere low temperature installations are required.
Application
All surfaces that ProPoxy 400 will be installed on must be free of frost and ice.
Remove the protective cap from the adhesive cartridge and insert the cartridge into the recommended dispensing tool. After the cartridge has been prepared, screw on the proper mixing nozzle to the cartridge. Do not modify mixing nozzle. Confirm that internal mixing element is in place prior to dispensing the adhesive. Take note of the air and base material temperatures and review Cure Schedule prior to starting the injection process.
Dispense a small amount of material from the mixing nozzle onto a disposable surface prior to initial injection into the drill hole. The product should be a uniform gray color with no streaks. When changing cartridges, never re-use nozzles. A new nozzle should be used with each new cartridge.
Step 1:
Drill hole in concrete using a rotary percussion power drill (rotary-hammer drill) and a carbide-tipped SDS or SDS-Plus type drill bit complying with ANSI B212.15-1994, to the diameter and embedment depth adhering to minimum
spacing, minimum edge distance, and minimum concrete member thickness. Caution: Wear suitable eye and skin protection. Avoid inhalation of dust during drilling and debris removal.
Step 2:
Blow out hole using oil-free compressed air at a minimum of 70 psi. While blowing air, insert the nozzle into the hole until in contact with the bottom
for not less than one second, and then withdraw. Repeat.
Step 3:
Insert a cleaning brush for the proper drill hole diameter. Thrust the brush to the bottom of the borehole while twisting. Once the brush is in contact with the bottom of the hole, turn the brush one-half revolution, and then quickly withdraw the brush with a vigorous, twisting pull. Repeat.
Step 4:
Repeat blow out of hole with air as per Step 2 above. Repeat step 3 followed by step 2.
Step 5:
When using cartridge insert the cartridge into the extrusion tool, and attach the supplied mixing nozzle to the cartridge. Do not modify mixing nozzle. Prior to injection, dispense some mixed epoxy through the mixing nozzle and discard until the color of the extruded material becomes uniform. After uniform color is achieved, insert the end of the mixing nozzle into the borehole until in contact with the bottom. Then, dispense the adhesive while slowly withdrawing the nozzle until borehole is approximately 1/2 – 2/3 full, and then withdraw the mixing nozzle. Keep the nozzle attached on partially used cartridges. A new mixing nozzle must be used if the gel time has been exceeded between injections.
Related Products:
| Weight | 1 lbs |
|---|---|
| Dimensions | 5.08 × 5.08 × 25.4 in |
Related products
All Products
Concrete
Adhesives
All Products


