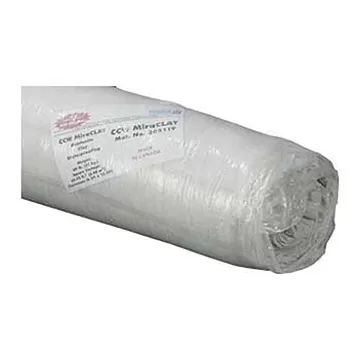
Carlisle Miraclay – 5ft x 14ft (70sqft) Roll
$237.50
MiraClay Bentonite Clay Waterproofing Membrane features a layer
of sodium bentonite clay sandwiched between a puncture-resistant,
nonwoven polypropylene fabric and a high-tensile strength woven
polypropylene fabric, then needle-punched together with durable denier
yarns. These fibers are then thermally fused to the polypropylene in a
proprietary Infra Bond technique, locking the sodium bentonite into place.
MiraClay is designed for waterproofing below-grade structural slabs as
well as construction methods incorporating lagging, concrete caisson
or shotcrete retention walls. MiraClay is also very effective in rehab
waterproofing and zero clearance property line construction
300 in stock
Carlisle Miraclay – 5ft x 14ft (70sqft) Roll
Features and Benefits of Carlisle MiraClay
- Self-healing if ripped or punctured
- In a hydrated state, the bentonite clay has tremendous impermeability and excellent resistance to chemicals (i.e., acids, bases and hydrocarbons)
- Expands and seals cracks in concrete up to 1⁄16” in width
Installation
Underslab Applications:
Carlisle MiraClay is designed for use under reinforced concrete slabs 4″ (100 mm) thick or greater on a compacted earth/gravel substrate. If installed over
a mud slab, MiraClay requires a minimum 5″ (150 mm) thick reinforced
concrete slab. For contaminated site water conditions, as determined by a
site water analysis, CCW MiraClay EF should be used. When hydrostatic
conditions exist, MiraClay should be installed under footings and grade
beams as shown in MiraClay details.
Substrate Preparation:
NOTE: Do not begin construction in work areas where there is standing water or in situations which may cause the MiraClay to prematurely hydrate.
Before installing Carlisle MiraClay, the substrate must be properly prepared.
Substrate may be concrete, earth, sand, pea gravel or crushed stone.
Earth and sand substrates should be compacted to a minimum 85%
Modified Proctor density. Crushed stone should not be larger than ¾” (18
mm) in size. Honeycombing, voids and aggregate pockets exceeding 1″ in
diameter or have a depth greater than ¾” should be filled with a non-shrink
cementitious grout. Fill tie-rod holes with a non-shrink cementitious grout.
Substrate should be smooth and uniform without sharp projections or pockets. Complete all required elevator pit, sump pit and grade beam and
piling work before installing MiraClay under main slab area.
Installation:
Install MiraClay over the properly prepared substrate with
the non-woven geotextile side up. Overlap adjoining edges a minimum of
4″ (100 mm); stagger sheet ends a minimum of 24″ (600 mm); and nail
or staple edges together as required to prevent any displacement during
concrete placement. MiraClay Granules may also be placed in the seam
for additional waterproofing performance.
When the slab is poured in sections, MiraClay should extend a minimum
12″ (300 mm) beyond the slab edge. When the installation reaches
the outer edge of the slab, continue MiraClay up and out of the form
a minimum of 12″ (300 mm). At the corner, MiraClay should remain
in contact with the substrate and inside the surface of the concrete
form. When the form is removed, the MiraClay outside the form should
be positioned and fastened onto the footing or vertical wall. Overlay
the MiraClay a minimum of 6″ (150 mm) with the succeeding vertical
waterproofing membrane.
At property line retaining walls, such as soldier pile or lagging, continue
the underslab MiraCLAY application up the retaining wall a minimum 12″
(300 mm) above the top edge of the slab or footing and secure. Overlap
the vertical MiraCLAY waterproofing membrane by a minimum of 6″ (150
mm) or a minimum of 12″ (300 mm) under hydrostatic head conditions.
Property Line/Lagging Application
Substrate Preparation:
Gaps between the wood lagging greater than
1″ (25 mm) must be filled with cementitious grout. In areas with large
gaps (1″ to 5″ (25 mm to 125 mm)) between lagging, install plywood to
provide a uniform substrate. Where drainage issues may arise, install CCW
MiraDRAIN to provide a uniform substrate as well as to facilitate drainage.
Installation:
Install MiraClay with the white non-woven side facing the installer. Secure the MiraClay into position with fasteners and 1” (25 mm) washers. Use the appropriate fasteners for the type of substrate used to receive the MiraClay. Install succeeding courses of MiraClay by overlapping the previous course a minimum of 4″ (100 mm). Stagger the seams a minimum of 24″ (600 mm). Install in shingle fashion so that the upper roll of MiraClay overlaps the lower roll. Fasten membrane once every 18″ (45 cm) on seams or as required to prevent blousing. Shotcrete installations require a seam fastening pattern not to exceed 12″ O.C. or as necessary to prevent seam blousing.
Extend waterproofing membrane to 6″ below grade and fasten membrane to the substrate to maintain constant compression using a 1⁄8″ x 1″ (3 x 25 mm) minimum termination bar. Embed the top edge of MiraCLAY and termination bar with a thick bead of Carlisle MiraClay Sealant 2″ (50 mm) wide by ½” (12 mm) thick.
Standard Foundation Walls
Substrate Preparation:
The substrate must be properly prepared to receive the MiraClay waterproofing membrane. All honeycombs, form-tie cavities and indentations should be filled with MiraClay Sealant or filled with latex Portland Cement. Substrate must be smooth and uniform removing any protrusions over ½” (12 mm) from the surface. Footings must be free of soil, rocks or debris to provide a suitable substrate to receive the MiraClay waterproofing membrane.
Installation:
The MiraClay waterproofing membrane should be installed with the white non-woven side facing the applicator. Create a cant at any vertical to horizontal transition by applying a 1½” (39 mm) to 2″ (50 mm) of MiraClay Granules or MiraClay Sealant along that junction. At the base of the foundation wall where the vertical wall meets the horizontal footing, install MiraClay in a horizontal manner extending out onto the footing a minimum of 12″ (300 mm). Fasten the MiraClay in place with concrete fasteners and 1″ (25 mm) washers. Install succeeding courses of MiraClay by overlapping the previous course a minimum of 4″ (100 mm). Stagger the seams a minimum of 12″ (300 mm). Install in shingle fashion so that the upper roll of MiraClay overlaps the lower roll. Fasten membrane once every 18″ (45 cm) to 3′ (90 cm) on seams or as required to prevent blousing. At grade line, terminate MiraClay with a rigid termination bar or fasten 12″ (300 mm) on center. Embed the top edge of MiraClay and termination bar with a thick bead of MiraClay sealant 2″ (50 mm) wide by ½” (12 mm) thick. Backfill must be compactible free of construction debris and must be uniformly compacted to a minimum 85% Modified Proctor on each lift.
Detail Requirements
For standard installation details, follow the MiraCLAY details drawings.
For non-standard installation instructions contact your local Carlisle
Coatings & Waterproofing representative.
Carlisle Coatings & Waterproofing recommends the use of CCW MiraDrain, a geocomposite sheet drain, to facilitate the removal of water away from the structure. The MiraClay and MiraDrain waterproofing and drainage system provides maximum protection against water penetration.
Limitations
MiraClay membranes should remain dry before and during installation.
Improper storage could lead to product deterioration. Not for use on CMU
foundations.
For Questions: Contact Us
| Weight | 90 lbs |
|---|---|
| Dimensions | 15.24 × 15.24 × 60 in |
Related products
$10.45
All Products
$159.58
All Products
$172.40
$74.98
Sale!
$182.00 – $206.42Price range: $182.00 through $206.42
Concrete
$14.45
Sale!
Aluminum
$11.50


